What Campgrounds Are Available?
Yosemite's 13 campgrounds can be broken down geographically into three categories: campgrounds in Yosemite Valley, campgrounds north of the valley, and campgrounds south of the valley (1).
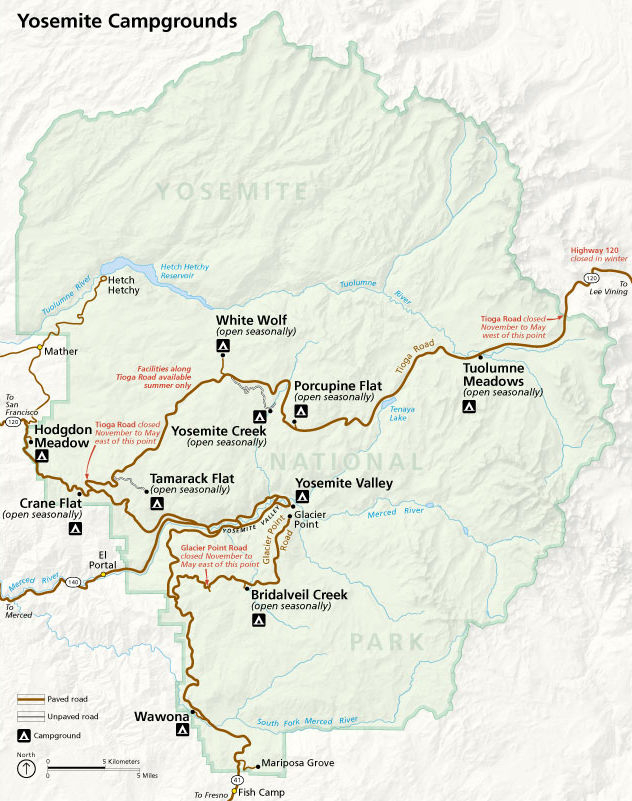
The campgrounds in Yosemite Valley, including Upper Pines, Lower Pines, North Pines, and Camp 4 (not reservable), are the hardest spots to get because of their close proximity to most of the park's icons. Four campgrounds are open year-round: Upper Pines, Camp 4, Wawona, and Hodgdon Meadow. The rest are open seasonally sometime between March - October of each year. See the chart below for estimate opening times, campground location, reservability, and total number of sites.
While the Pines campgrounds and Camp 4 offer instant access to many fantastic spots, you should consider other aspects of your camping experience as well before deciding where to stay.
Benefits for Staying in Yosemite Valley
- - You can ride the shuttle anywhere in the valley, making travel to key destinations less stressful
- - Most of the park amenities are found in the valley
- - Trails to Half Dome, Yosemite Falls, and many other highlights are found just a few miles from camp
- - It's an iconic campground with towering granite cliffs all around you
Benefits for Staying Outside the Valley
- - These campgrounds are MUCH quieter and less crazy
- - It's easier to reserve/find a spot
- - The high country offers more solitude and fantastic scenery (especially in the summer)
- - There are countless trails and climbing spots to be found, even if they are not as "Classic Yosemite"
Why is it so Hard to Get a Spot?
It all comes down to numbers. Between the months of June and September, over 2 million people will visit Yosemite National Park. The vast majority of those visitors will be spending their time in Yosemite valley because it is home to most of the park's landmarks. There are only 414 campsites available in Yosemite valley (2), which means there is way too much demand and not enough supply.
Since the reservation system is online, all of those people are vying for the campsites at the exact same time each month. So it all comes down to being fast and flexible.
How Do I Reserve A Site?
This is primarily for Upper Pines, Lower Pines, and North Pines campgrounds. However, on weekends and busier summer periods (July & August) it would be worth it reserve spots in places like Tuolumne Meadows, Crane Flat, and Wawona as well.
Sometime Before the Reservation Date...
Step 1) Determine Your Travel Dates
If you have the flexibility to visit during the week you will have a higher chance of securing your campsites. Try to arrive Sunday and depart on Friday so that you don't have to compete with weekenders coming in from nearby cities. Also, consider what you'd do if you can only get 2 or 3 nights in the park. Lay out a series of action steps you can quickly work through so that you don't waste time when the reservation window opens. Here's an example:
Plan A) Get a campsite in Yosemite Valley for 5 nights -- arriving Sunday and departing Friday.
Plan B) Get a series of campsites for 5 nights in Yosemite Valley (which means moving camp once or twice) -- arriving Sunday and departing Friday.
Plan C) Get a campsite at Crane Flats (outside the valley) for 5 nights -- arriving Sunday and departing Friday.
Plan D) Get 2-3 days in Yosemite Valley (for limited availability) then get a site in the nearby National Forest for the remainer of the time.
Step 2) Determine What Day your Reservation Window Opens
Now it's time to figure out when the booking window for your dates opens up. Reservations open on the 15th of the month, 5 months prior to your arrival. See the chart below to determine exactly when the first day to make reservations is.
| March 15 - April 14 |
November 15 |
| April 15 - May 14 |
December 15 |
| May 15 - June 14 |
January 15 |
| June 15 - July 14 |
February 15 |
| July 15 - August 14 |
March 15 |
| August 15 - September 14 |
April 15 |
| September 15 - October 14 |
May 15 |
| October 15 - November 14 |
June 15 |
| November 15 - December 14 |
July 15 |
| Wawona Group Site only: |
|
| December 15 - January 14 |
August 15 |
| January 15 - February 14 |
September 15 |
| February 15 - March 14 |
October 15 |
Note that you CAN book campsites in the following reservation window as long as your arrival day is within the current reservation window.
Step 3) Recruit Helpers
Enlist the help of two other people who can attempt to make the reservations at the same time as you. You will each choose a different campsite to go for and see who succeeds at getting one. Don't worry about overbooking sites, there is a holding screen which allows you to dump extra reservations before purchasing them. Make sure your helpers are tech savvy and can move quickly.
Step 4) Sign Up at Recreation.gov
Navigate to Recreation.gov. On the upper right corner click the "Sign In/Sign Up" button. If do not have an account yet then now is the time to create one. Fill out the information fields and make sure to remember your email address and password. Helpers need to create their own accounts.
THE MORNING OF - Get Set Up (6:45 AM PST)
You can work through a couple of steps before the reservation window opens. Then, once the clock hits 7AM PT, you will only need to click one button to hold your spot.
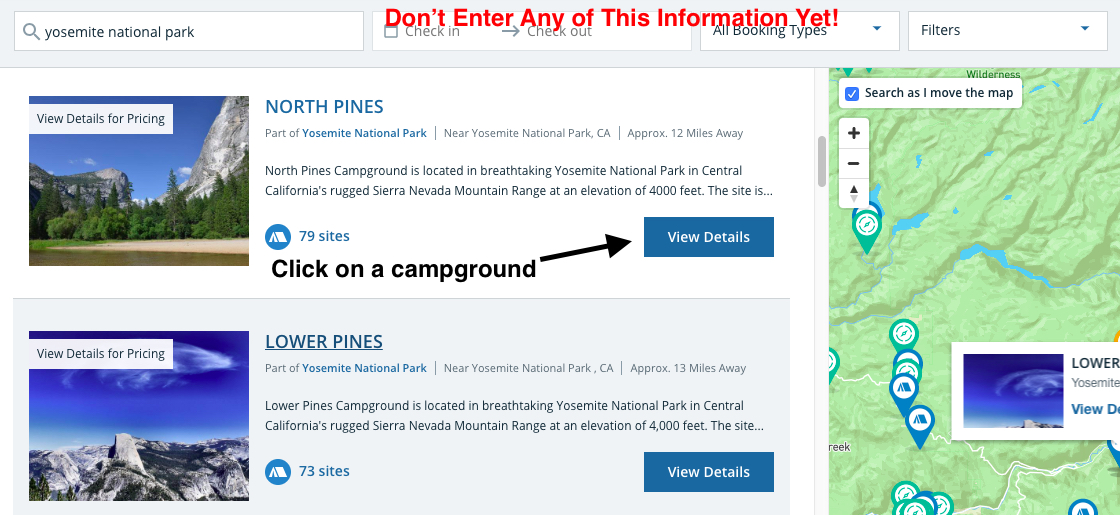
Step 5) Navigate to Yosemite reservation options on Recreation.gov
Navigate to the Yosemite National Park reservation options on Recreation.gov. Sign in if you are not already (IMPORTANT). Do NOT fill in any other information yet (such as check in, booking type, or filters). If you accidentally filled something in you'll need to close that tab and open the link again. Select the campground you wish to reserve a site at by clicking it.
Step 6) Enter your Arrival & Departure Dates
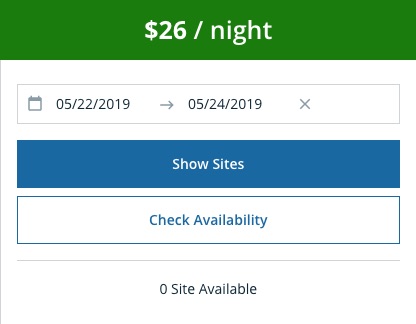
Now that you're within a campground page, it's time to enter your check in and check out dates. Enter this information then click on Show Sites
Don't worry that it says "0 sites available." You are booking beyond the currently open reservation window, but your reservation can still go through on a later page.
Step 7) Select a Campsite(s)
On this page you'll see a list of campsites on the left, and a map of the campground on the right.

Select a campsite by clicking a site on the map then clicking on View Details. You can also select a site by scrolling through the list on the left-hand site of the page.
Pay close attention to the type of camping equipment this site allows, maximum occupancy, and maximum number of vehicles. If you're in an RV, please note that electrical, sewer, and water hook ups are not available at any campsite in Yosemite. Dump stations are located in Upper Pines, Wawona, and Touloumne Meadows.
Strategy Tip: While it is definitely nice to have a riverside campsite, keep in mind that these sites are even more popular and thus even harder to get. Consider picking a site that is less "premium" OR perhaps have one of your helpers go for a less popular site while you try to snag that coveted spot.
You can always queue up a couple campsites that you can rapid-fire click when it's time. One tricky thing is that you cannot Open Link in New Tab because you will lose your dates and cannot input them on the campsite page. One work around is to copy and paste the link into a new tab while you are still on the campground page, reenter the dates there, then click on another campsite. If you have a couple helpers it's probably less important to queue up multiple sites yourself.
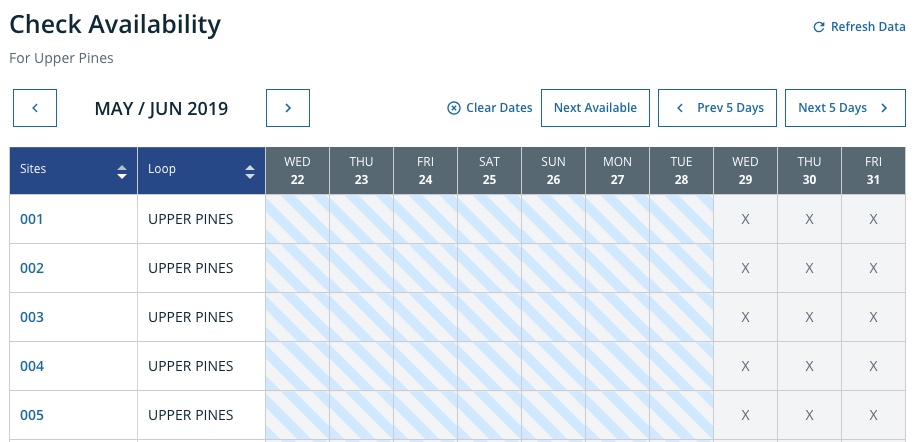
Step 8) Open up Check Availability page for Campground
A good contingency plan in case you don't get you pre-selected sites is to navigate back to the campground page. Re-enter your dates, you may need to type them in. Then click on the Check Availability button. This will all be book out but you can refresh this page later if needed.
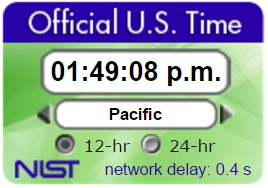
Step 9) Open up the Official Clock
Open up a new browser window with the official US clock. You can find it at this link. Make sure pacific time is selected.
Step 10) Wait...
This is as far as you can go until the reservations open up. Now it's just a waiting game until the clock hits 7:00 AM PT. Make sure your enlisted help also has their sites ready to go. Double check that they are not trying to reserve the same site as you (each person should target a different site number). Also take a moment to double check the dates, equipment type, and occupancy.
Step 11) Go!
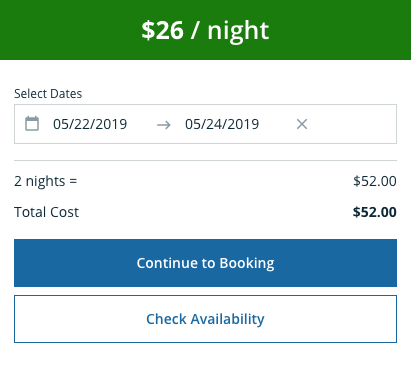
Once the clock hits 7AM PT, click the big blue button that says Continue to Booking. If you have multiple campsite tabs open then rapid fire the booking button before you worry about if you got anything or not.
You'll know you've succeeded if you are taken to a new page that says Order Details on the top.
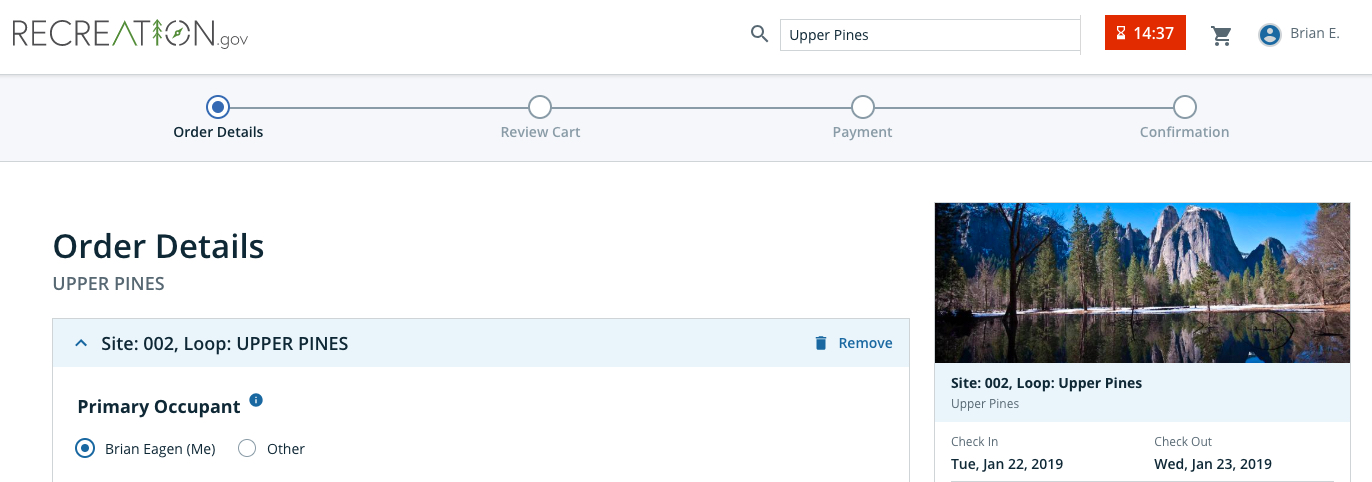
Step 12) If you have Succeeded... Communicate with your Enlisted Help
If you arrived at the Order Details page then you are temporarily holding the campsite for those dates. You have 15 minutes before they are released back to the public.
Communicate with the enlisted help and see if they were also successful. You don't want to book more sites than you'll need. Have them keep their Order Details window open until you complete the last steps.
You'll need to fill out a couple fields again: Primary Occupant, Occupants & Vehicles and Equipment Allowed. Choose who is the primary occupant. This person must show a photo ID when checking in.
Read all the information to double check that you are getting what you wanted. Then select the checkbox that you have read everything.
Finally, hit Proceed to Cart. If you need to book another site hopefully you've already queued it up on another tab and secured it to the booking screen. Otherwise, see Step 13.
Proceed to Step 13.
Step 12B) AHHHHH! It didn't go through - Check in with the Help
If you clicked Continue to Booking and a red box shows up...
...then it's time to quickly check in with the enlisted help. Very quickly see if anyone made it to the Order Details page. If so, take a deep breath and have them carry on to Step 12. If not, it's time to scramble.
Step 12C) Find out if there are still Sites Available at the Campground
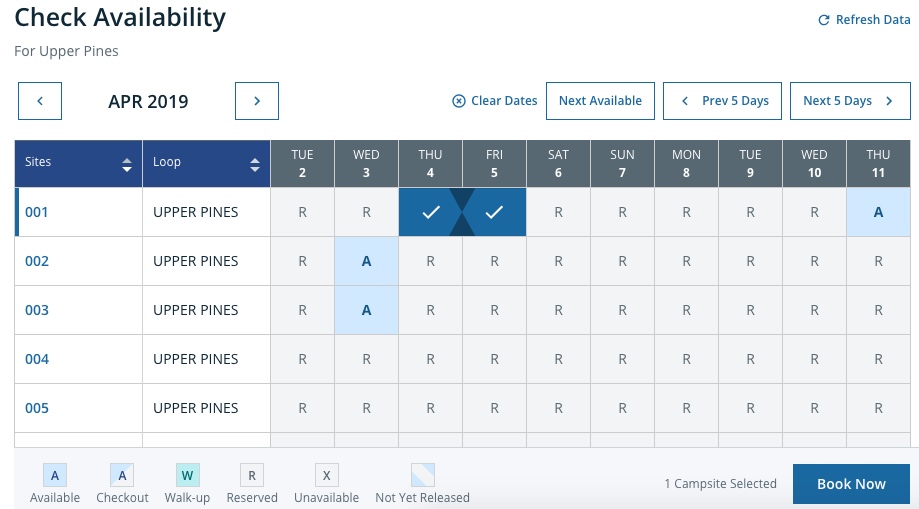
Hopefully you opened up a campground availability page. If so, click on the Refresh Data to the right of Check Availability. All the sites currently available will pop up as a blue "A". Click on one of these then select Book Now at the bottom.
If there is nothing available for the entire trip length, then it's time to move to Plan B, Plan C, or Plan D. You can try to piece together the dates you need for your trip. You can only have two reservations held in your cart at a time though, so you may need to use your enlisted help to get things done.
Or try searching other nearby campgrounds. Upper, Lower, and North Pines campgrounds all go very quickly, but try checking Crane Flat for a nearby alternative.
Once you have added any/all of the campsites reservations to your cart, proceed to Step 13.
Step 13) Verify Shopping Cart
Now you'll arrive at the Shopping Cart page. Note the reservation is only held for 15 minutes - you are on a bit of a timeline here so keep moving. Triple check everything, if it all looks good then click Proceed to Payment.
Step 14) Enter Payment Information and Complete Purchase
Enter your credit card information then hit Next and finally Continue. Again, don't linger too long since the hold time is still ticking.
Step 15) Let the Other Reservations Go
Now, if that all went through properly, you can instruct your enlisted help to release their campsites (or just wait 15 minutes and they will be released automatically).
Step 16) Take a Deep Breath
Good work. You've successfully booked a campsite at Yosemite National Park. You will get an email confirming your reservation which you should print off and bring with you when you visit. Give yourself (and your team) a highfive!
What to do if you Didn't Get a Site?
Don't despair. Here are some other options available to you.
#1) Camp Somewhere Less Busy
This might mean that you're not sleeping directly in Yosemite Valley, but there are some HUGE advantages (quieter, less impacted) to staying in one of the other campgrounds in the park. You may be able to snag a reservation at Tuolumne Meadows, Crane Flat, Wawona, or Hodgdon Meadow.
#2) Try to get a First-Come, First-Served Site
Camp 4 is the only first-come first served site in Yosemite Valley, and is a pretty hard spot to land (there are only 35 sites there). Other first-come first-served sites include Bridalveil Creek, Tamarack Flat, White Wolf, Yosemite Creek, and Porcupine Flat, and half of Tuolumne Meadows. Arrive as early as possible (noon is usually far too late) and wait at the kiosk or visitors center. Shoot for 6-7 AM for Camp 4 or Tuolumne Meadows. The other campgrounds are easier to secure spots in.
#3) Camp Outside the Park
While it means more driving time, there are a number of camping options outside of the park. You can stay at one of the private campgrounds near the west entrance or at one of the National Forest campgrounds outside of the park (use recreation.gov to find them).
Here's a great list of 10 free campgrounds that are fairly close to Yosemite.
#4) Choose Different Dates
Or you can always try a different range of travel dates, and you might have more luck. Try visiting in the autumn of late spring, before the park get's especially crazy.
#5) Visit a Nearby National Park
Yosemite is just one of nine fantastic national parks that are found in California. Head south to Kings Canyon / Sequoia national parks for equally breathtaking scenery. Or go north to Lassen Volcanic National Park for a cascade volcano and beautiful alpine environment.